Enable Fabric Copilot for Power BI
APPLIES TO: ![]() Power BI Desktop
Power BI Desktop ![]() Power BI service
Power BI service
This article is for organizations who would like to enable and start using Copilot in Microsoft Fabric, specifically in Power BI. We present how to enable Copilot in your tenant, start using Copilot in the Power BI service, and start using Copilot in Power BI Desktop.
For more information on other Fabric workloads, see the Copilot in Fabric overview. Note, you must have Fabric admin privileges to enable Copilot.
Enable Fabric Copilot for Power BI in your tenant
Before your business can start using Copilot for Power BI, you need to enable it in the Microsoft Fabric Admin Portal. There are two main settings related to Copilot that admins need to be aware of:
Enable Copilot setting
Navigate to the Tenant settings in the Fabric Admin portal and use the Search feature to locate the Copilot settings.
Toggle the switch on to Enable Copilot in Fabric.
Enabling Copilot in Fabric means that users can access Copilot across workloads. This means Copilot access isn't limited to a specific workload, like Power BI.

- Use the search bar (or scroll) to find the Copilot and Azure OpenAI Service (preview) settings.
- Toggle the switch to the on position.
- Specify who can access Copilot in Fabric. Select Apply to save your changes.
Enable sharing data across geographic boundaries
Enabling this setting only applies if Azure OpenAI isn't available in your geographic region.
If Azure OpenAI isn't available in your geographic region, you need to adjust one additional setting. This means that your data may be handled outside of your area.
If you’re okay with your data being handled outside of your area, switch on the setting Data sent to Azure OpenAI can be processed outside your capacity's geographic region, compliance boundary, or national cloud instance, and select Apply.


Important
If you have Fabric enabled, enabling Copilot in Fabric means that users can access Copilot across workloads. Copilot access isn't limited to a specific workload, like Power BI.
Use Copilot for Power BI in the service
To use Copilot in the Power BI service, you need to ensure that reports are located in a workspace in the right capacity. The workspace must be in either Premium Power BI (P1 and above) or paid Fabric (F64 and above) capacity.
Note
For a refresher on workspace access and permissions, see Roles in workspaces in Power BI.
Check your license type in the Workspace settings.
Select More to navigate to the Workspace settings.

Apply either Premium capacity or Fabric capacity to the workspace and use the x to exit workspace settings.
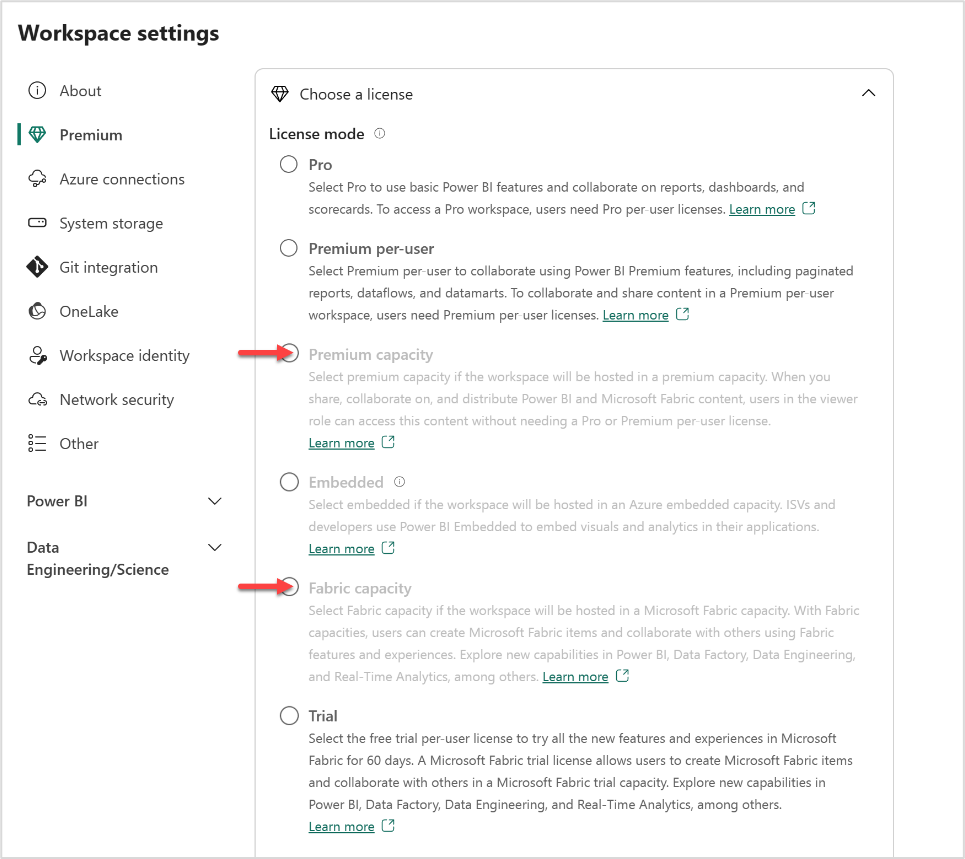
You can see which license mode is applied to your workspace under Premium. If License modes are grayed out, this workspace doesn't have access to the appropriate capacity.
Use Copilot in Power BI Desktop
To use Copilot in Power BI Desktop, you need admin, member, or contributor access to at least a single workspace that is assigned to a paid Fabric capacity (F64 or higher) or Power BI Premium capacity (P1 or higher) that has Copilot enabled.
Note
The Copilot button always appears in the ribbon in Power BI Desktop. To be able to use Copilot, you must be signed in and have access to a workspace that is in Premium or Fabric capacity.
When you use Copilot in Power BI Desktop for the first time, you’re asked to pick a Copilot compatible workspace when you select the Copilot button in the ribbon. The workspace you select doesn’t need to be the same as the workspace where you plan to publish your report.
Open a Power BI report and select Copilot in the ribbon. The Copilot pane appears and prompts you to select a workspace.

Select the workspace you’d like to associate this report with for Copilot use. Only workspaces that support Copilot will appear.

Use the Settings gear in the bottom right corner of Power BI to switch the associated workspace or check which workspace your report is associated with.

This will open the Options window, where you can navigate to the Copilot (preview) settings to see which workspace you’re currently working with and select a new workspace.

If you don’t have access to any workspaces that are in the correct capacity to use Copilot, you’ll see the following message in the Copilot (preview) settings: Either none of your workspaces have the right capacity to use Copilot, or you don't have the right permission to use them.

Licensing requirements
To use Copilot for Power BI, you must have access to a Premium Power BI capacity (P1 and above) or paid Fabric capacity (F64 and above). Your capacity (either Premium or Fabric) needs to be in one of the regions listed in this article, Fabric region availability.
Note
Copilot in Microsoft Fabric isn't supported on trial SKUs. Only paid SKUs (F64 or higher, or P1 or higher) are supported.
Send feedback
We always welcome your feedback about our products. Especially during public preview, your feedback helps us improve the product faster.
Related content
- Update your data model to work well with Copilot
- Create a report with Copilot in the Power BI service
- Create a report with Copilot in Power BI Desktop
- Write Copilot prompts for creating report pages in Power BI
- Create a narrative summary visual with Copilot for Power BI
- Write Copilot prompts for creating narrative visuals in Power BI
- Overview of Copilot for Fabric (preview)
- Frequently asked questions about Copilot for Power BI and Fabric
- Privacy, security, and responsible use for Copilot article in the Fabric documentation
- Copilot tenant settings (preview) article in the Fabric documentation
- Enhance Q&A with Copilot for Power BI
Feedback
Coming soon: Throughout 2024 we will be phasing out GitHub Issues as the feedback mechanism for content and replacing it with a new feedback system. For more information see: https://aka.ms/ContentUserFeedback.
Submit and view feedback for